NOTE
NOTE
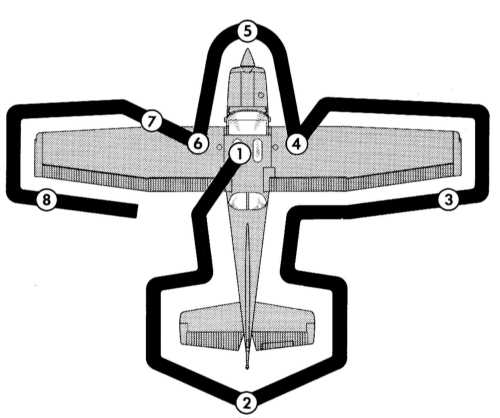
Visually check airplane for general condition during walk-around inspection. In cold weather, remove even small accumulations of frost, ice or snow from wing, tail and control surfaces. Also, make sure that control surfaces contain no internal accumulations of ice or debris. Prior to flight, check that pitot heater (if installed) is warm to touch within 30 seconds with battery and pitot heat switches on. If a night flight is planned, check operation of all lights, and make sure a flashlight is available.
CHECKLIST PROCEDURES
PREFLIGHT
INSPECTION
1. Pilot's Operating Handbook
-- AVAILABLE IN THE
AIRPLANE.
2.
Landing Gear Lever -- DOWN.
3. Control Wheel Lock - -
REMOVE.
4. Ignition Switch -- OFF.
5. Avionics Power Switch -- OFF.
6. Master Switch -- ON.
1. Rudder Gust Lock -- REMOVE.
2. Tail Tie-Down -- DISCONNECT.
3. Control Surfaces
-- CHECK freedom of
movement and security.
1. Aileron -- CHECK freedom of movement and security.
1. Wing Tie-Down -- DISCONNECT.
2. Main Wheel Tire -- CHECK for proper
inflation.
3.
Before first flight of the day and after each refueling, use sampler cup and
drain small quantity of fuel from fuel tank sump quick- drain valve and fuel
selector quick-drain valve (located on bottom of fuselage) to check for water,
sediment, and proper fuel grade.
4. Fuel Quantity -- CHECK VISUALLY for desired level.
5. Fuel Filler Cap -- SECURE and vent
unobstructed.
1. Static Source Openings (both
sides of fuselage) --CHECK for stoppage.
2. Engine Oil Level -- CHECK. Do not operate with less
than five quarts Fill to eight quarts for extended flight.
3. Before first flight of the
day and after each refueling, pull out strainer drain knob for about four
seconds to clear fuel strainer of possible water and sediment. Check strainer
drain closed. If water is observed, the fuel system may contain additional
water, and further draining of the system at the strainer, fuel tank sumps, and
fuel selector valve will be necessary.
4. Propeller and Spinner -- CHECK for nicks, security and oil
leaks.
5. Landing
Lights -- CHECK for
condition and cleanliness.
6. Nose Gear Doors -- CHECK for security.
7. Nose Wheel Strut and Tire -- CHECK for proper
inflation.
S.
Nose Tie-Down -- DISCONNECT.
1. Main Wheel Tire -- CHECK for proper
inflation.
2.
Before first flight of day and after each refueling, use sampler cup and drain
small quantity of fuel from fuel tank sump quick-drain valve to check for water,
sediment and proper fuel grade.
3. Fuel Quantity -- CHECK VISUALLY for desired level.
4. Fuel Filler Cap -- SECURE.
1. Pitot Tube Cover -- REMOVE and check opening for
stoppage.
2. Fuel
Tank Vent Opening -- CHECK for stoppage.
3. Stall Warning Vane -- CHECK for freedom of movement
while master switch is momentarily turned ON (horn should sound when vane is
pushed upward).
4. Wing Tie-Down -- DISCONNECT.
1. Aileron -- CHECK for freedom of movement and
security.